office (631) 273-2500
fax (631) 273-2557
toll-free (800) 645-2522
Tutorial : Introduction
A complete Listec Pro News hardware system consists of a computer
(either laptop or desktop); connection to monitor(s); the USB hand control;
and a Listec Pro News Security Key. Optionally, a printer may be connected.
Below is a discussion of each of these devices, and how they connect to the computer:
Below is a discussion of each of these devices, and how they connect to the computer:
Monitor Connection
 A scan converter converts the computer's video signal
(referred to as VGA in this document), into the kind
of video signal that Listec Pro Newsmpter monitors use,
which is composite video.
A scan converter converts the computer's video signal
(referred to as VGA in this document), into the kind
of video signal that Listec Pro Newsmpter monitors use,
which is composite video.NOTE: Depending on the inputs available on the prompter monitor, it may be possible to use a VGA cable for the video connection. In this case, a scan converter is not necessary.
Different brands of scan converters vary in features, but the general setup procedure is the same, as listed in the example below. Please consult the documentation that comes with the scan converter for details on all of the functions available, and more specific information on how to connect it.
-
Connect the scan converter cable to the computer's VGA output.
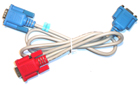
There is a special cable that came with the scan converter (an example is pictured at right), which typically has three VGA connectors on it. One, which is typically blue, is a male connector (it has pins that stick out). This connector, which may also have "PC" printed on it, should be connected to the VGA port on the back of your computer. Most VGA connectors on computer are also blue.
 If you're using a computer with an external monitor that connects to the VGA
port (such as a typical desktop computer), first disconnect it from the computer,
then connect the cable as described above, and finally, re-connect the external monitor
cable to the second blue connector on the scan converter cable.
If you're using a computer with an external monitor that connects to the VGA
port (such as a typical desktop computer), first disconnect it from the computer,
then connect the cable as described above, and finally, re-connect the external monitor
cable to the second blue connector on the scan converter cable.
- Connect the cable to the scan converter's VGA input.
The other male connector on the cable, typically red and marked "scan converter", should be connected to the VGA input on the scan converter. The scan converter's VGA connector is usually a red female connector. - Connect the composite video from the scan converter to the prompter.
When using a Listec Pro News prompter monitor, use professional grade coaxial cable with BNC-type jacks to connect the scan converter. Most scan converters come with RCA connectors for video output, so you'll likely need a BNC-to-RCA adapter (pictured at right) to make the connection.
 Locate the composite video output connector on the scan converter, and connect the end of the BNC cable that has the
RCA-to-BNC adapter to it. Then, run the cable to the prompter monitor, and connect it to the video input
(on a Listec Professional Monitor, either BNC connector can be used for video input).
Locate the composite video output connector on the scan converter, and connect the end of the BNC cable that has the
RCA-to-BNC adapter to it. Then, run the cable to the prompter monitor, and connect it to the video input
(on a Listec Professional Monitor, either BNC connector can be used for video input).
- Connect power to the scan converter.
Finally, supply power to the scan converter, which is provided by either a standard wall-mount AC adapter, or sometimes via a USB or PS-2 cable.
 AC Adapter -- First, connect the end with the power connector to the scan
converter. Then plug the transformer end into a wall socket, power strip, extension
cable, UPS device -- whatever provides you with AC.
AC Adapter -- First, connect the end with the power connector to the scan
converter. Then plug the transformer end into a wall socket, power strip, extension
cable, UPS device -- whatever provides you with AC.
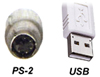
USB or PS-2 Cable -- First, connect the end with the power connector to the scan converter. Next, determine what kind of connector the cable has: a USB connector is rectangular at end and approximately ½'' in diameter; a PS-2 connector has a circular-shaped connector with six pins around a central post. Find the appropriate plug on your computer, and connect it. Note that on most desktop computers, the keyboard and mouse are PS-2 connectors. Un-plug the keyboard or mouse, plug in the power cord, and plug the disconnected device back into the power cable.
USB Hand Control
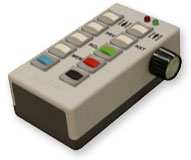 Listec's custom serial hand control provides direct control over the prompter, including start/stop, speed, inverse video,
previous and next script, and other commonly used commands.
Listec's custom serial hand control provides direct control over the prompter, including start/stop, speed, inverse video,
previous and next script, and other commonly used commands.The included USB Type A cable (standard USB "printer" cable) is used to connect the controller to your computer.
 Show how to connect the USB Controller.
- Connect the USB cable to the controller.
 First, find the USB type A jack on the controller. If you're looking
at the buttons on the controller, the jack is located on the top.
Plug the matching end of the USB cable into the jack, making sure
the connector is firmly in place.
First, find the USB type A jack on the controller. If you're looking
at the buttons on the controller, the jack is located on the top.
Plug the matching end of the USB cable into the jack, making sure
the connector is firmly in place. - Connect the USB cable to your computer.
First, locate an available USB port on your computer. Connect the adapter to the port, and then tighten the mounting screws. Windows will find the appropriate driver and will notify you that "Your new hardware is ready to use" when the process is completed.
Note that drivers are installed on a "per port" basis. If you move the hand control to another USB port, the driver association process will be repeated.
Security Key
 The Security Key "unlocks" the software, and enables Prompting and Remote Update features. The software may be installed on as
many computers as necessary, but only the one with the security key attached will be able to scroll, and/or receive remote updates.
(All other program features are available without the key.)
The Security Key "unlocks" the software, and enables Prompting and Remote Update features. The software may be installed on as
many computers as necessary, but only the one with the security key attached will be able to scroll, and/or receive remote updates.
(All other program features are available without the key.)There are two types of security keys available: a classic parallel port dongle (pictured at right), and a more modern USB token. Both provide the same functionality, but the setup is slightly different.
Show how to connect a USB token.
- Install Listec Pro News software.
Before attaching the USB token, install Listec Pro News software and the security key drivers. This ensures that the
correct drivers will be installed when the token is attached.
Software installation Instructions. - Locate an available USB port on your computer.
A USB port is approximately ½'' in diameter, rectangular in shape. Note that a USB hub may be used to add additional USB ports to a computer, though there are limits on the ability of hubs to power USB devices. - Plug the token into the USB port.
Plug in the token and the computer will configure it.
Printer
 If providing a hard copy of the script is important, connect and configure
a printer.
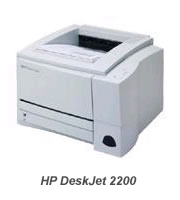
If providing a hard copy of the script is important, connect and configure
a printer.Printers come in a wide variety of models by many manufacturers; also, the types of connectors can vary. This tutorial is going to assume you're using a printer with a parallel port connection. (Please consult the documentation for your specific printer for more specific help with getting it connected.)
See Microsoft Windows Help for assistance connecting your printer.
Next: Software Setup
